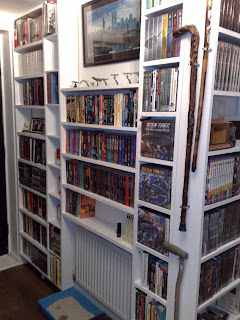
I had posted a few pics on my bookcase online with The BookCase Project with some positive responses & a lot of questions about it, especially the photos of the hall bookcase which will be shown later in the blog. But I'll start at the beginning as to how it all started.
Now I love my books but also love DVDs & both need somewhere to store them, I aint one for eBooks or streaming movies. I so prefer owning them physically & that means I need to find ways to utilise the limited space in my flat. But I found conventional melamine bookcases limited in utilising space & often waste the space needed & fall apart all too soon.
So I decided it was time to build my own, use planks of wood cut to length & screwed together. Nothing fancy or complex, just screws holding it all together as nothing heavy to go in each shelf but goes from floor to ceiling with as many shelves as possible & that's what I did for my first one.
And it worked well, so well I did some more for the bedroom & use some dead space behind the door.
And was going to add more but I then moved to a smaller flat with lower ceiling heights & new storage problems I had to overcome. This meant a complete rethink on how I was going to do the shelving & where. The answer was to utilise the wide space of the hall in the flat & fill one side of the hall with bookcases, problem was it was L shaped so the bookcases I had had to be reconfigured for a lower height & fit around a corner. So out came the designer in me & did some drawings...
So over a period of time I slowly built it like I had before in sections starting with the ones I already had whilst decorating whole of the flat too.
And needed to get flooring redone before the shelving was completed which involved in sealing the concrete & laying laminate flooring.
And slowly over months it came together...
You can see it slowly taking shape as was the rest of the flat...
Then it was time to paint it all. That was fun in a small flat...
It was slow to do but this is the final result that looked fantastic with the rest of the hall...
So now they have been completed, I was pleased with how they went & these are the photos I posted to The Bookcase Project with some amazing feedback for such a simple design. Like I said, just some planks screwed together. lol
Well the following year I had moved again which now posed a new challenge to show how versatile the wooden shelving is. I had a whole wall in the livingroom to use.
So I started again in re-configuring & adapting the existing shelving to go along the wall.
Not much else has been done to it as yet, I do have plans but I have been busy doing the rest of the livingroom 1st that needed more done & the shelving doing well as it is atm tho filled up fast & looking to do some more shelving in another room...
And others have been impressed in my shelving & I have helped build them some too, this one was a fun one to do as it was a Zig Zag design to fit in a very small box room for a young teenager.
A simple design made from planks, but so versatile in how to use them. :)


No comments:
Post a Comment